In this tutorial we will learn how to build, train, and test simple recurrent networks (SRNs) in the LENS simulation software. This tutorial assumes you have read the earlier mini-tutorial on feed forward networks. If you are not familiar with feed forward networks, you should probably go read that first. You might also want to download and unzip this archive, which contains all the files referenced in the tutorial below.
SRNs are networks that take inputs and generate outputs over several sequential steps of time. Many behaviors studied in the lab in cognitive science, as well as naturalistic real-world behaviors, have this character. SRNs have been instrumental in developing theories in several cognitive domains, including working memory and cognitive control, memory for arbitrary serial order, sequential comprehension and production of single words, and sentence comprehension and production. A very useful resource for understanding the core interest and basic operation of SRNs is Jeff Elman’s classic paper from 1991.
In the current tutorial, we will build a network that learns to perform a variant of the AX task. In the standard AX task, people view a sequence of letters and are instructed to press a button whenever an X appears, UNLESS the X was preceded by an A, in which case they should NOT press the button. This task, though very simple, draws out some important characteristics of cognitive control and working memory. Specifically, to perform correctly the participant must (a) retain a representation of a prior event (the preceding letter), (b) continually update this representation with each new letter in the sequence and (c) use the representation of the prior event to constrain the response generated to the current item. In particular, when an X appears following an A, the participant must use the “memory” of the preceding A to *inhibit* the response usually associated with the X (the button press).
The task variant we will study here adds a further level of complexity. In the AXBY task, participants must press button 1 whenever an X appears, UNLESS the X was preceded by an A in which case no button should be pressed, UNLESS the A was preceded by the letter B, in which case button 2 should be pressed. This task thus requires the participant to retain and continually update information about the preceding two letters in the sequence, and to use this conjoint representation to shape the response generated for the X (button 2 if preceded by B then A; otherwise no button if preceded by A; otherwise button 1). Extensive research on tasks similar to this have suggested that these abilities are supported by structures in the prefrontal cortex, and that behaviors on such tasks can be understand by SRN-like mechanisms.
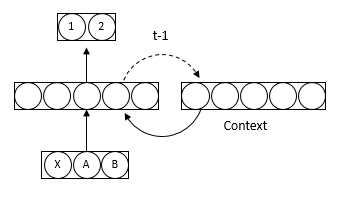
Simple recurrent network for AXBY task
As previously, we should begin with a picture of the model like the one above. The model gets direct input for the currently-viewed letter, which in this case can be X, A or B. Input units send feed-forward connections to a hidden layer, which in turn project to an output layer containing two units. The first unit indicates a press for button 1; the second indicates a press for button 2. If no button is to be pressed, neither unit should be activated. Note that all of these connections are feed forward.
Hanging off the side of the hidden layer is a second layer of units, labeled “Context.” The context units, like the input, send feed-forward connections to the hidden layer. However, they also _receive_ connections from the hidden layer, which are shown as a dotted line labeled t-1. These connections play a special role: rather than transmitting information from sending to receiving units via weighted connections in the usual way, they instead simply _copy_ the activation pattern from the previous point in time to the units in the receiving units. It is these connections that makes the network “recurrent.” The hidden layer and context layer together are sometimes jointly referred to as a “recurrent” layer.
To build this network we begin with the addNet command as previously:
addNet axby -i 20
As before this creates a network object called axby. Note, though, the additional information: -i 20. The -i stands for “intervals”; the argument indicates that the network will operate over a maximum of 20 intervals of time, with each interval corresponding to a single “step” in a pattern sequence. In the AXBY task, each step might be the appearance of a new letter, for instance. Specifying the number of intervals tells LENS to expect patterns with multiple steps, and indicates the maximum length of the pattern sequence.
Now we need to add the network layers:
addGroup input 3 INPUT
addGroup context 5
addGroup hidden 5
addGroup output 2 OUTPUT
This should all be familiar from the feed forward tutorial, but note one thing: LENS updates unit activations in each layer *in the order that the layers are created*. In this case, with each new input, units in the INPUT layer will first be activated, then the context units, then the hidden units, then the output units. With a SRN, it is important that you specify the context units *before* the hidden units from which they receive connections. This way, when context units are updated, the pattern copied from the hidden layer will be the pattern generated from the *previous* input, which is what you want.
Now we connect the groups:
connectGroups {input context} hidden output
This should be familiar, but what are the curly braces? This is LENS shorthand indicating that bout input and context units send connections to the hidden layer. Whenever there are multiple layers all with the same connectivity to other layers, you can group them with curly braces in this way to make coding a bit more efficient.
So far we have all the feed-forward connections but not the dotted “copy” connection that makes the model recurrent. Adding such a connection requires a new command:
elmanConnect hidden context
elmanConnect creates a connection type that simply copies activations from the sending to the receiving layer.
That is it for building the network! As usual, however, we need an environment to train and test the patterns. How do we specify sequences in environments?
I’ve made some patterns in the file names axby.ex in the current directory; open it now in a text editor of your choice. The top of the file after the preamble looks like this:
defI: 0
defT:0
actI: 1
actT: 1
;
name: Block1 10
i: 0 t: 0
i: 0 t: 0
i: 1 t:
i: 0 t:
i: 0 t: 0
i: 1 t:
i: 0 t:
i: 2 t:
i: 1 t:
i: 2 t:
;
The file header is just the same as we have seen previously; it specifies default values and activation values for inputs and target states, as previously. Next comes:
name: Block1 10
Just as before, name: Block1 specifies that the name of the pattern (or in this case, of the pattern sequence) is “Block1.” The following number tells LENS how many steps there are in the pattern sequence. Recall that the network specifies that there will be a maximum of 20 steps in any sequence, but this does not mean that every pattern sequence must have 20 steps. You can specify the exact number of steps for each sequence with a number following the name specification.
The remaining lines simply indicate the input and target patterns for each step of the sequence. For instance the first such line:
i: 0 t: 0
…indicates that, for the first step of the sequence, the input pattern should apply the active input value (actI in the header) to unit 0, and the default input value to all other input units, while the active target value (actT in the header) should be used for unit 0 of the output and the default target should be used for the remaining output unit. Step 2 specifies the same patterns for input and target; step 3 specifies that input unit 1 should be active while both outputs should receive the default target value, and so on.
Recall that, as in the diagram, unit 0 in the input stands for the letter X, unit 1 stands for A, and unit 2 stands for B. Looking down the column of input values, then, this pattern codes a sequence that goes: X X A X X A X B A B. The target values then indicate the correct button-press response given the AXBY rule. With the first X, button 1 should be pressed (ie, unit 0 should be activated). Same with the second X. Then comes an A so no button should be pressed. Then another X, but because it was preceded by an A, again no button should be pressed, and so on down the sequence.
Notice that there is *no* semicolon at the end of each step in the pattern. The semicolon indicates the end of the pattern sequence, so it appears after all 10 steps in the pattern. Everything from name: to the semicolon specifies one pattern sequence. When processing this pattern, LENS will, with each “step” of time, apply the corresponding input pattern and compute activations generated throughout the rest of the network. The pattern file axby.ex contains four more sequence blocks of this kind, each with a different number of steps.
To process the patterns, you load them at the command line just as before:
loadExamples axby.ex -exmode PERMUTED
Open the unit viewer and you should now see the four pattern sequences loaded down the left side of the display. Click on the first pattern (Block1), and notice that the arrows in the upper right corner of the display have turned black. These arrows step forward or backward through the sequence. If you click on the single rightward arrow, you will advance forward through the sequence one step at a time. Try this now, and notice that (a) the inputs change according to the sequence described above and (b) with each step forward the hidden unit pattern is copied over to the context units.
The model is trained just like a feed forward model. First click on the radio button labeled “Gradient descent,” then change the learning rate to 0.05 and set the number of training epochs to10000 times. Open the graph window and click the Train button a couple of times until the error has dropped substantially. If you keep training, you should notice that the error does not keep dropping smoothely. Instead, the error curve occasionally “blows up”—going all wobbly, then settling down a bit, then going all wobbly again. What is going on? Doesn’t backpropagation always reduce error?
What’s happening is that, although backprop is computing the error gradient correctly with each new activation update–that is, on each step of the sequence for every sequence–the deltas at each weight are summed together across all sequence steps and all patterns before they are used to adjust the weights. The sum of these deltas weighted by the learning rate is then applied to change all the weights at once. With many steps and many patterns, this can lead to a large “overstep” in the error landscape, leading to increase in error. When you see this pattern, it is often an indicator that your learning rate is too high.
Reset the network and change the learning rate to 0.001. Now click Train again several times until the error has gotten quite low. Hopefully things now look somewhat more smoothe, and you eventually reach a quite low error.
Click through the patterns and make sure the model is getting the right outputs. Is it doing the AXBY task properly? In particular look at Block3, which contains the notorious BAX sequence that requires pressing button 2. Did your network learn to do it? If yes, congratulations—it has achieved working memory span 2.
How do we know the network is doing anything interesting as opposed to just “rote memorizing” the 4 sequences it was trained on? One way is to test it on a new set of sequences that obey the same AXBY “rules.” I’ve generated such a set in this directory. It is called axby_test.ex. Load it now:
loadExamples axby_test.ex
By default this should be loaded into the Test Examples slot in LENS. In the unit viewer, from the drop down menu select Test Examples as the set you wish to look at in the viewer. You should now see 5 new pattern sequence blocks, each exactly 20 steps in length. Click on any pattern sequence and step through it. Is your model generating the correct outputs at each step? Congratulations again—your model has done more than simply memorize the training patterns; it has learned how to do the AXBY task in a more general way. Does it make occasional errors? Well, so do most subjects in this task.
There is one thing left to consider, which is how to best construct those tedious example files. Did I just make them up out of my head and type them into a text editor? Heavens no–too much work. Instead I used formulas in Excel to generate random sequences and to compute the correct output according to the AXBY rule. You can see the file for the test examples in the current directory, in the excel file labeled axbypats.xlsx. Open this up and you will see that columns A-C use some probabilities specified in the first 3 rows, together with the RAND() function, to generate, for each sequence, a stream of Xes, As and Bs. Columns E through H specify the patterns in the format that LENS expects. However the cells in columns F and H use formulas to determine which units should be active in the input and the target, given the random XAB sequence generated. To create the file axby_test.ex, I just copied the cells in columns E-H and pasted the into a text editor, then saved the text file.
In general, using Excel, R, or any other data processing tool of your choice is a great way to speed up creation of example files.
As a final exercise: Have a look at the included file axby_longercontext.in. Try to figure out what it is doing. Train it on the same patterns, and see how quickly it learns the “hard” BAX subsequence that should lead to button-press-2. Does it learn it more quickly than the standard model? If so, why do you think that is? What is different about the architecture? Does this model generalize as well as the standard architecture, or better, or worse?